
Overview
Speakol is a MENA region-focused content discovery and recommendation platform. Utilizing artificial intelligence & machine learning technologies to understand the intended goals and interests of actual visitors in real-time & featuring native ads to the most relevant audience.
This ensures that we recommend content and premium native ads where it is most relevant based on consumers' profiles.
Challenge
Until recently, we were only serving Image Ads. and the challenge began when we wanted to add Video Ads to our inventory. The main challenging pints were as follows:
- Response time to show and auto-play video as fast as possible.
- The video must be adaptive, so that we won’t exhaust our users’ bandwidth.
- The streaming service that streams the video.
- Try to keep a minimum bandwidth transfer to minimize the cost of infrastructure.
Baby steps
We started from zero; let's put some limitations on the video file being uploaded (max size: 15mb), save it on an s3 bucket, and serve it directly through our CDN (AWS Cloudfront + Cloudflare).
Results and observations:
- HTML video element doesn’t stream the file. It downloads the file entirely first and then plays it.
- This works fine on a fast internet connection, but our major audience is on (Slow/Medium) 3G Networks.
So, we decided to tackle these challenges one by one, and we started by the video size on a slow internet connection.
Compress & Resize Video
Our widget that holds the articles and ads boxes, each box has a maximum width of 360px, and we are working with a 16:9 aspect ratio.
So, we thought why not when the users upload the video file, we use any tool that compresses and resizes it to our desired dimensions and see how much we will get the size to, and serve it directly from CDN.
Result and observations:
- We used FFmpeg to resize the video file, for example, a video file with the size of 11mb we managed to make it 3mb.
- The response time was faster, of course, from the original file, but still the HTML Video element download the whole file then plays it.
Conclusion: We need adaptive video streaming.
R&D
We started to search for the best (and cost-effective 😁) solution to serve the video files adaptively.
Test Subject
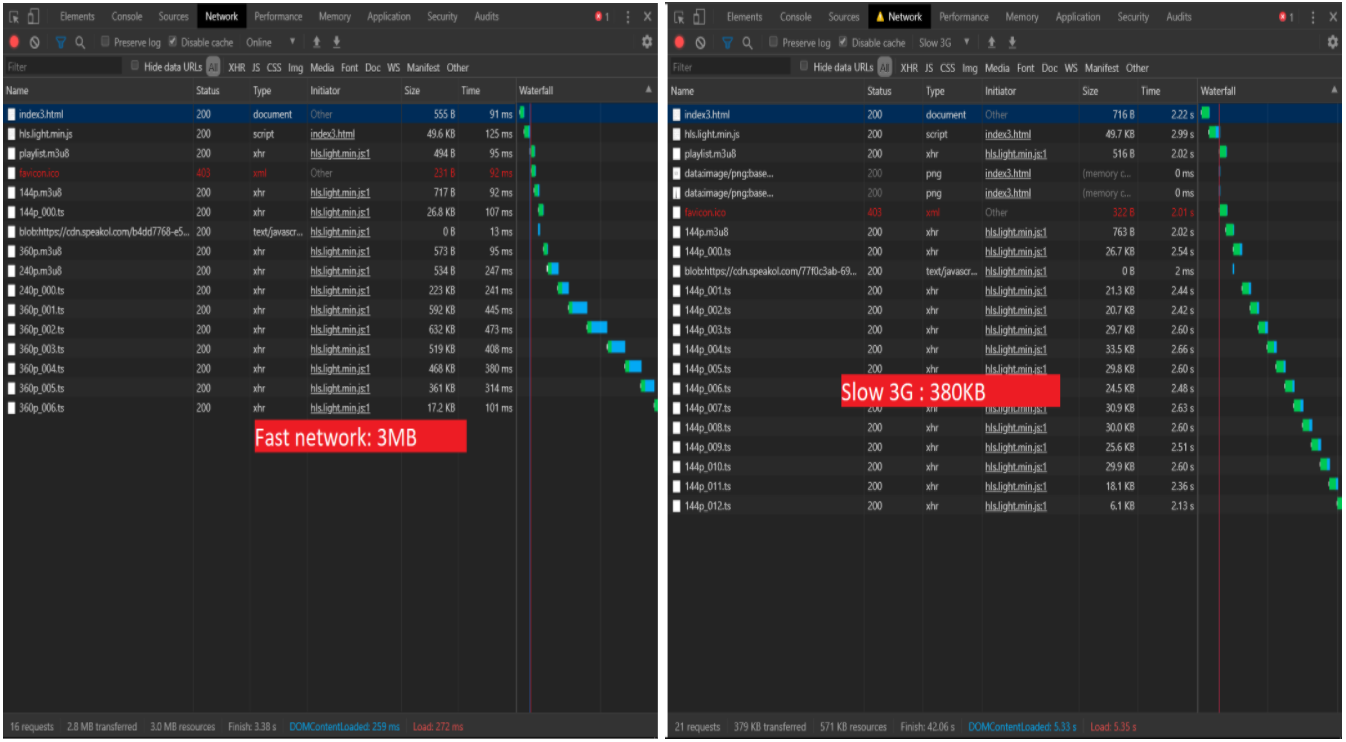
Viewing Video file of 29 seconds duration and 11.5 Mb in size on Slow 3G network.
Cloudflare
We are already using Cloudflare as our outer edge and CDN, and we came across one of their services, which is called Stream. Stream simplifies on-demand video streaming by bundling storage, transcoding, distribution, and playback in an easy-to-use solution. https://www.cloudflare.com/products/cloudflare-stream/
We thought Oooooh Yeah! That’s it, let's use it. The service mainly works as follows:
- Upload your video to s3.
- Give the s3 link to Cloudflare Stream API, the service downloads it, and do its magic.
- It gives you an ID to use into their HTML Stream Player like the following:
<stream style="width: 360; height: 202.5px;"
src="7a097401f2494b090b44c15c0e7c6891" preload autoplay loop mute>
</stream>
<script data-cfasync="false" defer type="text/javascript"
        src="https://embed.videodelivery.net/embed/r4xu.fla9.latest.js">
</script>
Here we go, let's test it and see the performance, from now on all our tests are made on Slow 3G networks, fast networks don’t matter.
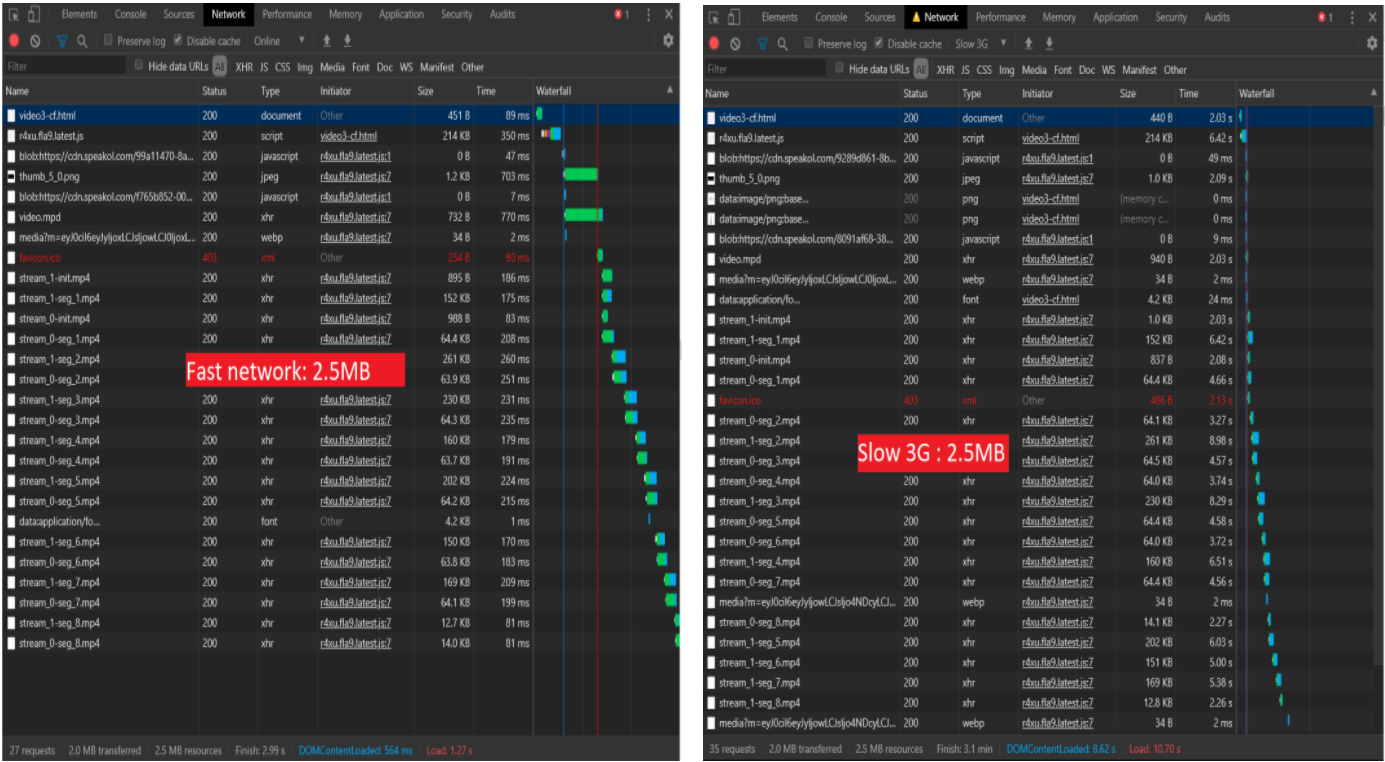
Results:
From this video, we can see that:
- It took 16s to start playing the video.
- Cloudflare didn’t adapt the video quality, and it played the same segments in Slow & Fast networks which is (2.5mb) as below
- And from the above video, we can see a considerable lag while playing
Why not do it yourself?!
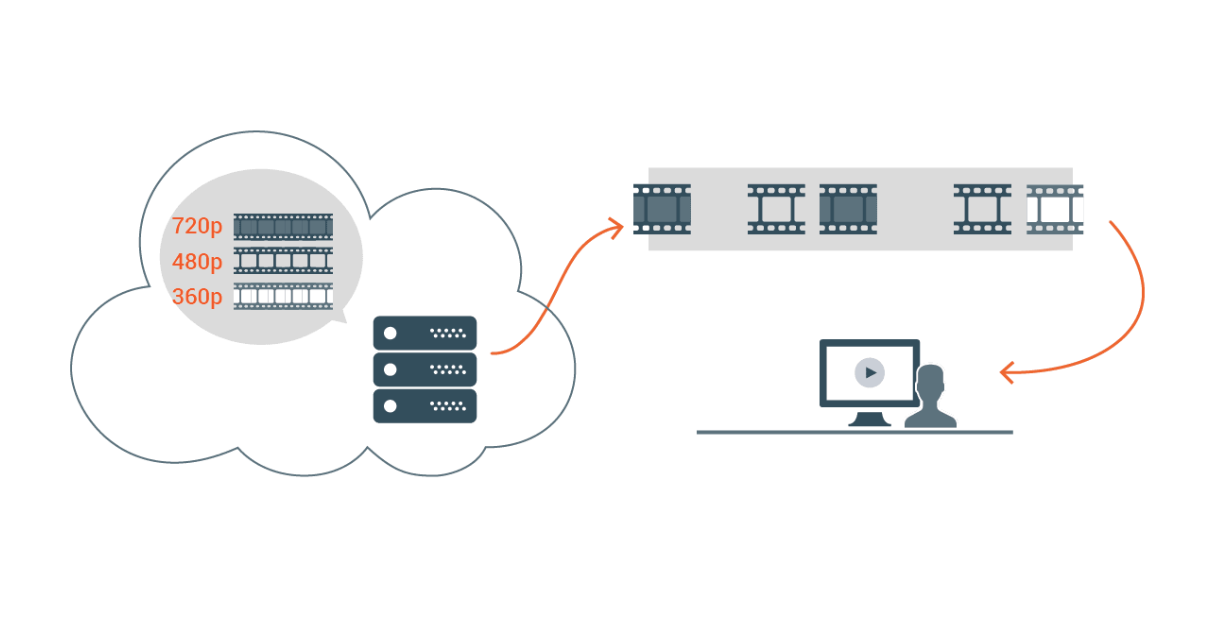
What is Adaptive HTTP Streaming?
Adaptive Streaming was designed to target this particular problem. The underlying idea is as follows. You encode and store the video content with multiple resolutions. Furthermore, you thinly slice the video into multiple data units, instead of storing the entire video in one big file. Then, when the user plays the video, the stored video strategically uses the network information to provide the user with an optimized streaming service. With this kind of technology, because the file has been encoded with multiple sources, the user is given access to an optimized and selected source for the file, and because the file has been split into numerous chunks, the user can change the quality of the video with relative ease
Server-Side (A.K.A AWS Lambda Function)
Each video file must be encoded with supporting resolutions, and since there are multiple files, information regarding each chunk must be provided to the client. The overall flow of adaptive streaming is as follows.
- When uploading the video, the video is sliced into thin segments.
- Each segment is encoded according to the resolution designated by the requirements of the service. During this process, the number of segments increases proportionately to the number of resolutions available.
- A Manifest, a file that contains information on the corresponding media segment and the respective resolution, is provided to the client.
- When the video file is sliced into segments, different tools are used for different Codecs. We used Apple-HLS using FFmpeg.

Client-Side
The standard for allowing Adaptive Streaming over the web client is the Media Source Extensions (MSE), and it is used to transfer streaming data to the player.
- The client requests the manifest file that contains information regarding segmented data of the video to the server.
- The client parses the manifest file to receive the necessary information, including the resolution and quality, then identifies the path to obtain the corresponding segments (i.e. CDN, URL).
- The client measures the user’s bandwidth, and selects the optimized video quality according to the manifest, and downloads it. (The bandwidth is measured again as the segments are being downloaded.)
- Provides the downloaded segment data to the MSE buffer.
- MSE decodes the data and provides the video object to the player to stream.
Apple-HLS Developed from Apple
- In spefic browsers, including Safari, HLS could be used directly using the media source from the HTML5 Video.
- Since Safari for mobile does not support MSE, only HLS can be used.
- Media Container Format: mp2ts, mp4 (2016)
- Uses M3U8 for manifests
#EXTM3U
#EXT-X-VERSION:3
#EXT-X-STREAM-INF:BANDWIDTH=150000,RESOLUTION=256x144
144p.m3u8
#EXT-X-STREAM-INF:BANDWIDTH=500000,RESOLUTION=426x240
240p.m3u8
#EXT-X-STREAM-INF:BANDWIDTH=800000,RESOLUTION=640x360
360p.m3u8
HLS Support for All Browsers
HLS is not supported in all browsers, so we had to use a 3rd party library called hls.js to play the video.
Let’s try it!
We ran ffmpeg with the following params for three encoding types:
var encodeParams = [{'bitrate': '0.15M', 'width': '256',
 'height': '144', 'crf': '40','g': '24',
 'keyint': '24', 'hlstime': '1', 'name': '144p'},
 {'bitrate': '0.5M', 'width': '426',
 'height': '240', 'crf': '20', 'g': '48',
 'keyint': '48', 'hlstime': '2', 'name': '240p'},
 {'bitrate': '0.8M', 'width': '640',
  'height': '360', 'crf': '20', 'g': '48',
  'keyint': '48', 'hlstime': '2', 'name': '360p'}];
ffmpeg -y -i in.mp4 -c:v libx264 -b:v 0.15M -ac 1 -c:a aac
-b:a 24k -vf scale=w=256:h=144 :force_original_aspect_ratio=decrease
-field_order progressive -profile:v high -movflags faststart
-r 10 -crf 40 -g 24 -keyint_min 24 -sc_threshold 0
-hls_time 1 -hls_playlist_type vod
-hls_segment_filename 144p_%03d.ts 144p.m3u8 - -y force choosing yes for any question from FFmpeg
- -i in.mp4 - set in.mp4 as input file
- -c:v libx264 set video codec to be H264 which is the standard codec of HLS segments
- -b:v 0.15M limit video bitrate, these are rendition specific and depends on your content type
- -ac 1 -c:a aac -b:a 24k - set audio codec to AAC with bitrate of 24k
- -vf "scale=w=256:h=144 :force_original_aspect_ratio=decrease" - scale video to maximum possible within 256x144 while preserving aspect ratio
- -field-order progressive – this means to compress the video using a progressive method
- -profile:v high - set H264 profile to high - this means support in HD
- -movflags faststart -r 10 - IMPORTANT reorganize the MP4 atoms, so the moov atom is at the start for fast start
- -crf 40 - Constant Rate Factor, high-level factor for overall quality
- -g 24 -keyint_min 24 - IMPORTANT create keyframe (I-frame) every 24 frames (~1 seconds) - will later affect correct slicing of segments and alignment of renditions
- -sc_threshold 0 - don't create keyframes on scene change - only according to -g
- -hls_time 1 - segment target duration in seconds - the actual length is constrained by keyframes
- -hls_playlist_type vod - adds the #EXT-X-PLAYLIST-TYPE:VOD tag and keeps all segments in the playlist
- -hls_segment_filename 144p_%03d.ts - explicitly define segments files names144p.m3u8 - the path of the playlist file - also tells FFmpeg to output HLS (.m3u8)
From this video, we can see that:
- I took 10s to start playing the video.
- Our solution adapted the video quality in Slow & Fast networks as below
- And from the above video, we can see almost, and there is no lag while playing the video

So, we did it, and these numbers are perfect for us. All we have to do now is to tie it all together with our system as an automated process to transcode the video the moment it is uploaded to our service. So, we came up with the following flow.
Flow

What is all this 😅? Let’s break it down:
- The Advertiser uploads the video file.
- The backend saves the original file to S3 then initiate a job to transcode the file
- The Job executes the Lambda function on the file
- The lambda function downloads the original file from s3 and trans-codes it using FFmpeg then saves it to s3 again
- The backend is notified when the function finishes execution and saves the new video info in the database.
FFMPEG on a NodeJS serverless Lambda (AWS)
First, a few things everyone should know about node Lambda runtime environment:
· They run on Linux x86_64
· The directory /tmp is the only path writable
· To use any 3rd party tool, it must be through a Layer· To be able to execute and bin file it must be in “nodejs\node_modules”
FFMPEG Layer
From Layers tab in Lambda Service, we will create a new layer that will contain the FFmpeg bin files


FFmpeg files are around 52mb, and the limit upload size in a layer is 10mb, so we will upload it first to S3 and insert the S3 URL while creating the Layer.
IMPORTANT NOTE: The zip file must be in this structure: “\nodejs\node_modules\ffmpeg\*.*”
Lambda Function
From the functions tab, we will create a new function

Then choose the layer that we created to be available for our function

Now we can write our code that will execute FFmpeg on the video file, we can find the FFmpeg bin in this path
“/opt/bin/ffmpeg”.
IMPORTANT NOTE: you will not be able to execute the bin from the previous path. You have to copy it to “/tmp” folder first.
Sample code will look like this:
var playlistContent = "#EXTM3U\n#EXT-X-VERSION:3\n";
var encodeParams = [
    { 'bitrate': '0.15M', 'width': '256', 'height': '144', 'crf': '40', 'g': '24', 'keyint': '24', 'hlstime': '1', 'name': '144p' },
    { 'bitrate': '0.5M', 'width': '426', 'height': '240', 'crf': '20', 'g': '48', 'keyint': '48', 'hlstime': '2', 'name': '240p' },
    { 'bitrate': '0.8M', 'width': '640', 'height': '360', 'crf': '20', 'g': '48', 'keyint': '48', 'hlstime': '2', 'name': '360p' }
];
var processing = false;
for (var i = 0; i < encodeParams.length; i++) {
    var currentParam = encodeParams[i];
    var processing = await childProcessPromise.spawn(
        path.join(workdir, "ffmpeg"),
        ['-y', '-i', inputFile, '-c:v', 'libx264', '-b:v', currentParam['bitrate'], '-ac', '1', '-c:a', 'aac', '-b:a', '24k', '-vf',
            'scale=w=' + currentParam['width'] + ':h=' + currentParam['height'] + ':force_original_aspect_ratio=decrease', '-field_order', 'progressive',
            '-profile:v', 'high', '-movflags', 'faststart', '-r', '10', '-crf', currentParam['crf'], '-g', currentParam['g'], '-keyint_min', currentParam['keyint'],
            '-sc_threshold', '0', '-hls_time', currentParam['hlstime'], '-hls_playlist_type', 'vod', '-hls_segment_filename',
            path.join(workdir, currentParam['name'] + '_%03d.ts'), path.join(workdir, currentParam['name'] + '.m3u8')],
        { env: process.env, cwd: workdir }
    );
    playlistContent = playlistContent + "#EXT-X-STREAM-INF:BANDWIDTH=" + parseFloat(currentParam['bitrate'].replace('M', '')) * 1000000
        + ",RESOLUTION=" + currentParam['width'] + "x" + currentParam['height'] + "\n" + currentParam['name'] + ".m3u8\n";
}
await writeFileAsync(path.join(workdir, 'playlist.m3u8'), playlistContent);
if (processing) {
    var createFolder = await s3Util.createFolderS3(inputBucket, uploadkey);
    var files = fs.readdirSync(workdir);
    for (var f = 0; f < files.length; f++) {
        var name = files[f];
        var ext = name.toLowerCase().split('.')[1];
        if (['ts', 'm3u8'].includes(ext)) {
            const filePath = path.join(workdir, name);
            const fileKey = path.join(uploadkey, name);
            await s3Util.uploadFileToS3(inputBucket, fileKey, filePath);
        }
    }
    var stats = fs.statSync(inputFile);
    var fileSizeInBytes = stats["size"];
    return { 'success': true, 'size': fileSizeInBytes, 'path': path.join(uploadkey, 'playlist.m3u8') };
}
Conclusion:
FFMPEG’s appears to be overwhelming at first glance. When dealing with media there are a ton of things to consider and FFMPEG enables us to fine tune all of these considerations to our liking.
We’ve easily integrated advanced concepts like encoding modes and segmentation in a basic media file conversion in a simple way to the point of being automated using the AWS Lambda Service.
There’s definitely more than one way of doing anything in FFMPEG, so if during the course of reading this article you come up with a different way of doing something, please let us know!
At the end I would like to share some great readings to understand more what is Adaptive streaming and FFMPEG .
 Medium
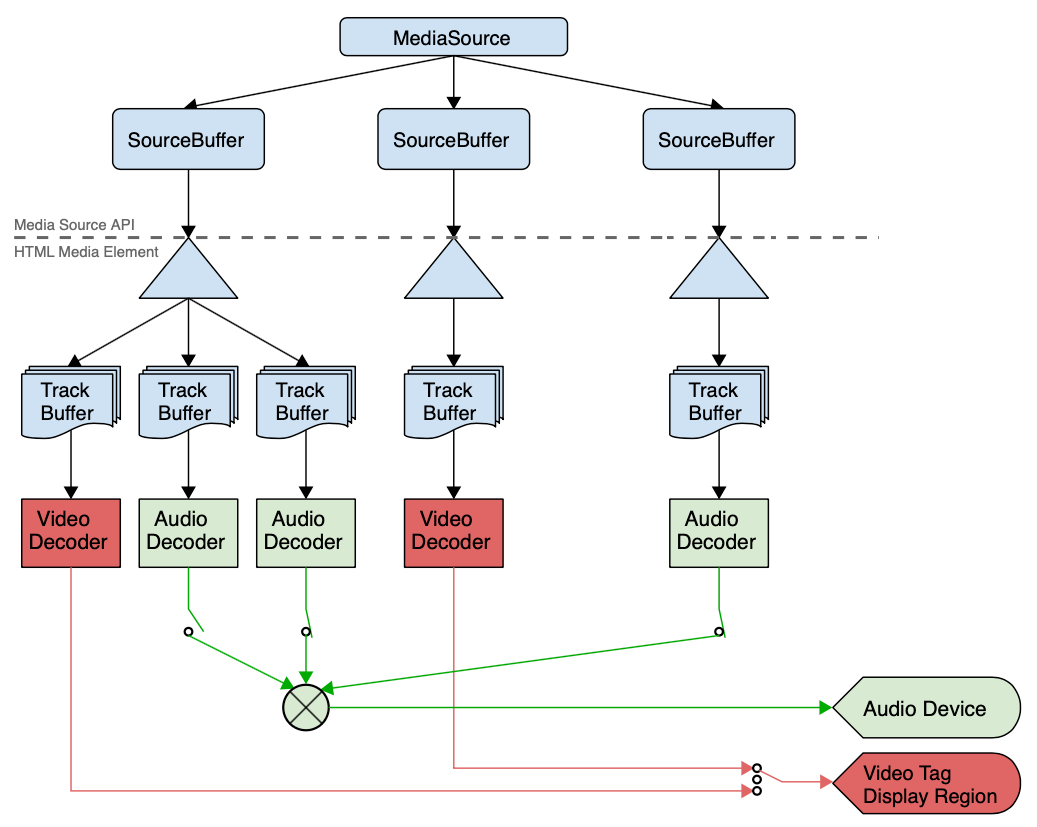 Medium
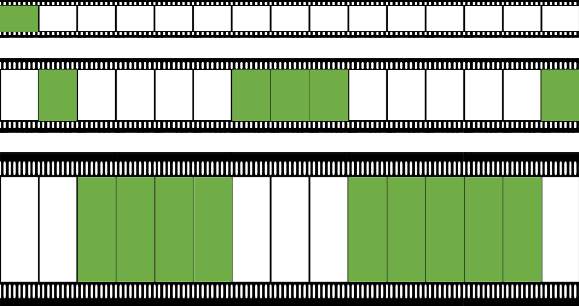 Medium